What type of girl are you?
I’m not going to lie…triple stitch finishes with raw edges are not my favorite kind of designs. I love a satin stitch anything! But, they have become very popular, mostly because they are quick and easy to stitch. I do get a lot of messages from people that are not familiar with this type of finish, and if you don’t pay attention to the photo and read the description, then you may not realize that you bought an applique that isn’t “finished.” I then explain that this design was intentionally made this way, and I didn’t “forget” to put the satin finish on it! After I go thru my explanation, they understand, are happy again and politely ask me if I would make the design with a satin finish! And since I have a hard time with saying no, and completely understand their frustration, I usually do! After all, you either love this type of finish or hate it…there is no in between!


You can see the different finishes in the two photos of the fleur de lis. The applique on the top has a satin stitch finish while the one on the bottom has a triple stitch finish exposing the edge of the fabric.
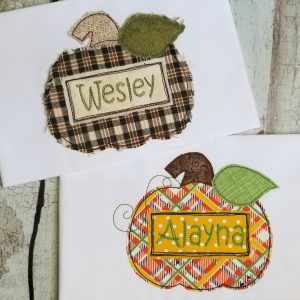
Now look at the photo above…both pumpkins were stitched using a triple stitch finish. The difference is that on the bottom pumpkin I pressed Heat-n-Bond on my fabric and trimmed about a quarter of an inch away from the stitch line; and on the top pumpkin, I didn’t use anything on my fabric so that I would get a ragged edge. I trimmed the fabric about half an inch from the stitch line and I also ran the stitch line on my machine two times for extra security.
Tips for stitching an aplique with a triple stitch finish:
- Wash and dry your fabric before using. Your fabric will shrink and if you cut too close to the stitch line, like you would for a satin stitch applique, then your fabric will pull away and possibly come apart.
- If you’re going for a finished look, press your fabric with a layer of heat-n-bond. This will not only keep your fabric from unraveling, but will also adhere your fabric to your shirt giving the applique more stability when it is washed. You can get heat-n-bond lite here.
- Don’t trim as close to the stitch line as you would for a satin stitch finish. I usually cut about 1/4 inch, that gives me a little extra room in case my cut is not even all the way around, and I need to trim in some other areas.
- If you want the raveled, ragged edge, don’t use heat-n-bond and don’t trim as close to the edge of the stitch line.
- That’s it…they are really quite simple and versatile!
If you have more tips that you think will help someone, feel free to join in and post a comment. We would love to hear from you.
Have a great day….Melissa
www.bigbeeapplique.com